Annotations
Working with images that speak.Here you will learn how to add words (annotations) to your images.
Your first annotation and taking a look at the defaults
?w=320&h=70&bgc=_4c96d7&annotate=t:How+are+you+doing?

First thing to disclose is we are building a canvas by using a transparent pixel (1x1) gif, and requesting it at 320x70 pixels with a background color.
_px.gif?w=320&h=70&bgc=_4c96d7
Some defaults we can mention for this annotation:
- Placement is at the top-left (
northwest) of the image - Color is
white - Font is
Roboto - Pointsize is
24
Anatomy of &annotate
The annotate transformation is a complex querystring parameter where all the following values can be specified.
| Property | param | Description | Default |
|---|---|---|---|
| Text | t | The text to annotate | Annotation |
| Placement | o | Placement + offsets of the annotation | northwest,0,0 |
| Pointsize | s | Sizing of the font | 24 |
| Color | c | Color for the text | white |
| Font | f | Text font View list | Roboto |
| Base64 | b64 | Flag to specify if text has been Base64 encoded | false |
All these values are given in the same annotate parameter as pairs separated by * (star)
These pairs are each separated by : (colon)
An example of making a size 30 black annotation centered to the bottom of the image would be:
&annotate=t:My%20Annotation*s:30*c:black*o:south

The pairs are:
- t : My Annotation (url encoded)
- s : 30
- c : black
- o : south
and are all smashed together with stars *
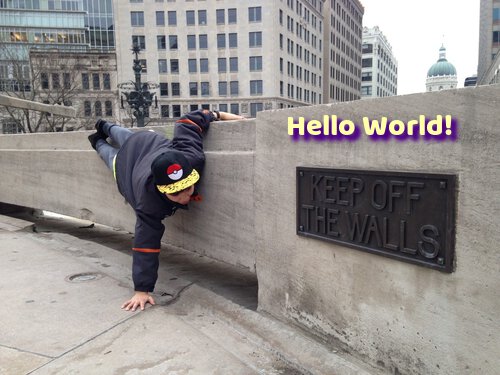
Now let’s change the font to Baloo and center it in the image (also set a faint yellow color)
&annotate=t:Hello%20World!*s:30*c:_ffa*o:center*f:Baloo

Placing the annotation [o]
o:<snap-point>,<x-offset>,<y-offset>Placing can itself become complex to allow flexibility.
The simplest value is specifying a snapping point on the image which can be thought of as places along the image border (and the center), which can be:
northwest  north   northeast
west       center       east
southwest  south   southeast
Another way to place your annotation can be by specifying x and y coordinates like: 0,0
The origin 0,0 is the image’s top-left corner by default. This origin changes depending on the snapping point specified.
And for maximum flexibility, using the 3 possible parts: o:south,0,10 < — This places the annotation centered and snapped to the bottom of the image, then it separates it 10 pixels from the bottom border.
Without offset
&annotate=t:Hello%20World!*s:30*c:_ffa*o:south*f:Baloo

With offset
&annotate=t:Hello%20World!*s:30*c:_ffa*o:south,0,10*f:Baloo

Base64 encode your annotation texts to avoid surprises.
Because the parameter uses stars and colons for its syntax, Base64 enables annotating these characters (along with other controversial characters) safely.
Each font will manage it’s paddings in their own way.
Shadows
There are yet more instructions for annotate that are targetted towards creating a shadow (or border).
| Property | param | Description | Default |
|---|---|---|---|
| Shadow Width | sw | Shadow/Outline width | 0 |
| Shadow Color | sc | Shadow/Outline color | black |
| Shadow Offset | so | Shadow/Outline offset respective of annotation | 0,0 |
| Shadow Blur | sb | Blur for the Shadow/Outline | 0 |
Shadow with width=2
&annotate=t:Hello%20World!*s:30*c:_ffa*o:center*f:Baloo*sw:2

Shadow with width=2 and blur=2
&annotate=t:Hello%20World!*s:30*c:_ffa*o:center*f:Baloo*sw:2*sb:2

Shadow - adding offset and making it indigo
&annotate=t:Hello%20World!*s:30*c:_ffa*o:center*f:Baloo*sw:2*sb:2*so:4,4*sc:indigo

On the test image (with offset 120,-60)
Multiple Annotations
While the annotate instructions can be complex, this is to support all the values to achieve its configurations. Another factor that was considered is the ability to specify multiple annotations for the same image. This is achieved by appending more &annotate parameters to the transformation.
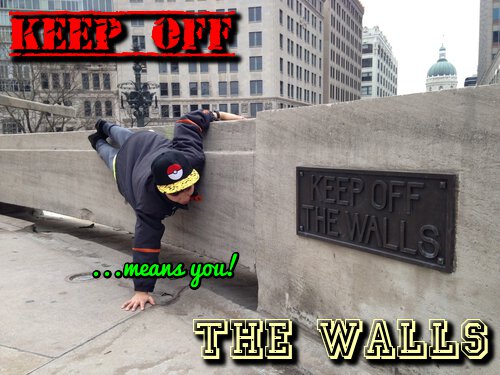
&annotate=t:S0VFUCpPRkY=*b64:1*s:45*c:_f00*o:northwest,10,10*f:OldStamper*sw:2*sb:2*so:4,4*sc:black
&annotate=t:THE+WALLS*s:45*c:_ffa*o:southeast,10,10*f:JerseyLetters*sw:2*sb:2*so:-4,-4*sc:black
&annotate=t:...means+you!*s:25*c:lime*o:90,240*f:Pacifico*sw:4*sc:black